7/31/10

The Knitters Guild Master Knitting Program - Progress Report #2

I'm totally frustrated.

I did figure out that somewhere along the way my Purl stitch was weirdly backwards.  Once I started to doing it correctly, the swatches for my lessons started looking more normal.

I have a couple of bad habits I've developed over the years, and the habits have gotten worse now that I end up felting so many of my items, perfectly even stitches aren't that crucial.  Felting covers up a multitude of errors.

I've done the first swatch with cotton, acrylic, and wool.  The wool makes more even stitches.  I started with a size 8 straight needles, but now I'm using 9's and Cascade 220 wool.  The first swatch is complete, it has garter stitch for 4 inches, and is about as even as I can get it.  I believe I did this swatch at least 7 times before I was happy with it.  Swatch 2 was only re-done 4 times.  Swatch 3 twice.  And Swatch 14 which uses the same needle and yarn as 1, 2 and 3 I've had to re-do 3 times.  Today I knit it in one setting.  I'm still doing something wrong, but I think my instructors will be able to tell me what I'm doing wrong.


This isn't a picture of my swatches, it's a picture of my Felted Fedora before I felted it.
There are decreases to start shaping the top of the hat.


So, I'm 1/4 of the way there on my swatches and ready to start writing answers to the many questions topics about what I've learned and what research I've done, documentation ... fun stuff.  I'm really enjoying this, I know it will improve my work.

7/25/10

Keeping Track of Your Pattern - Weaving

Weaving for Cutting Apart
Placemats, napkins, and towels are some of the many handwoven fabrics woven as a single length on the loom but meant to be cut into sections later. If you know where you'll want to cut, here’s a good way to prepare the place.
After the first piece, weave two rows of contrasting yarn—two rows because the valley between them forms an indentation that’s easy to follow with a scissors. Plain weave provides a clear path for cutting, although any two treadles that lift opposite shafts work well.
When you are ready to separate the pieces, stitch on top of the first yarn of each section, next to the contrasting yarn. Stitch up one side, turn the fabric, and stitch down the other side of the contrasting pair. Stitching before cutting prevents the last rows of each section from loosening.
Use a zigzag or straight stitch. If you choose a zigzag, set its width so that it encloses only one yarn and sew with that yarn centered in the presser foot opening. If you choose a straight stitch, set the length slightly shorter than the number of ends per inch so that the needle pierces every warp end as well as the weft that the stitching follows.
For a firmer edge, stitch again next to—but not on top of—the previous stitching.
When you cut between the two contrasting yarns, these rows ravel out, but bits of them may stick if the yarn is caught by the sewing machine needle. If you’ve sewed evenly, they ravel out easily leaving a clean edge with a very tiny fringe that helps taper the cut edge.
back to top

Found this web page


Making a Weaving Guide
Use a weaving guide for each of your projects to make weaving more enjoyable.
A weaving guide is a strip of cash register paper marked with the weaving measurements and pinned to one edge of the fabric on the loom. You can buy rolls of cash register tape at office supply stores.
To make a weaving guide, calculate the finished length of the piece, including hems. Then add shrinkage to determine the woven length on the loom. For instance, a towel with a finished length of 28" plus a 1" hem at each end equals 30". Add 10% for shrinkage and the woven length on the loom is 33".
Cut a length of cash register paper longer than the project length, about 40" long for this example. At the beginning end, write the name of the project and the date. Then draw a starting line. Measure 33" and draw an ending line.
Attach the weaving strip to one side of your weaving with two long pins, about 4" apart. Leapfrog the pins as you weave, taking out the first pin and re-pinning it close to the fell of the cloth while the other pin keeps the strip attached to the weaving. Both ends of the strip are unattached—if the strip is very long, wind up one end and fasten it with a paper clip. When you’re finished with the weaving, roll the strip with the project name and date on the outside, fasten with a paper clip, and keep it for reference for future projects.
Example of a weaving guide
There are many advantages to using a weaving guide. Let’s say that you want the two ends of the towel to match. Fold the strip in half, matching the starting and ending line to find the middle of the towel. As you weave, mark the strip with repeats and color changes. During weaving, when you reach the middle of the towel, remove the guide and transfer the marks to the other half of the strip. Reattach the strip and weave to the end of the guide. With very little effort, you’ve woven a towel with matching ends!
Using a weaving guide for every project allows you to weave faster and with more confidence. It helps ensure that your project turns out the right length and keeps track of your pattern when you mark treadling and color repeats. Once you try a weaving guide, you’ll wonder how you ever wove without it.   

7/17/10

Spending the day preparing a Bible Study for a Womans group, and listing my handmade items on Etsy.

Multi-tasking today.

I'm preparing a message for a woman's Bible study group and getting several items posted on my Etsy shop.

I'm really mixing it up, but not really, I think some people who observe Christians are of the opinion that if you're a believer you have to have your face in the Bible at all times, meaning you ain't spiritual enough if you ain't studying.  Well, 32 years of serving God, telling others about my faith, I think I've realized one and only one thing.  God wants our devotion to Him to be revealed when we are away from our personal Bible study time.

Yes, he wants us to pray, and worship Him and declare the amazing gift He gave us through His son's death on the cross. 

Things coming out of our mouths in the form of words mean nothing, if the actions we display when we turn and say cross words to the person(s) observing our life, or we short-change someone for our benefit, or act unfairly in any manner unbecoming a believer.  So the true answer to being holy isn't what we say, but whether we do what we say.

No, this isn't my lesson for the Woman's Bible Study, this is my conviction for me today.

If you had observed me yesterday, freaking out because (with my sister following in the car behind me) driving to the bank, the exit and entrance signs were not clear.  When ONE sign says Exit Only and also says Entrance Only would you be concerned about going into a one lane entrance knowing this is the only way out for people already in there?  So, I sought out another entrance, which placed me into a parking that forced me to park and exit my car, to go into the bank, cash a check, instead of driving through the ATM lane, using a card to get cash.  I was more than agitated, because I was thinking the ATM must be inside, once I was in there I was the only customer in a huge lobby with tellers on the back wall, no ATM in site.

I tried to explain the confusing signs to the teller, but she just wanted to see some I.D.

I think I was probably not a good "do as I say person," because, instead of going back to my car, I went straight to my sisters car and told her how the teller had treated me, when I tried to explain how confusing her parking lot is.  I simply forget sometimes that I have a choice on the battles I choose, and the way I square up to people to make a complaint.  My sister laughed and laughed at my behavior, because it was unexpected and she hadn't seen me in this form, and it was unbecoming and out of character behavior for me. 

Sometimes I really kick against the behavior I know I'm supposed to display and just put it right out there, that I have issues with this imperfect world I'm stuck in.

OK with that out of my system, I'm listing some items on Etsy today, and I have some better pictures of my scarves that I've been weaving.  Here is a taste of this fall's projects.  I think I've landed on a yarn I love and a style that really pleases me.  Enjoy.


For this scarf I used left over yarn from Aven's Hoodie below:


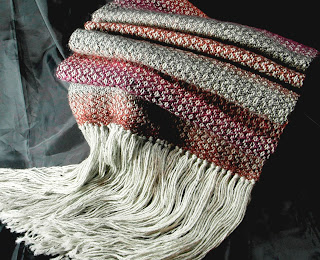
Below is a scarf made from sock yarn, also, the Gray tweed fringe is the warp, and the different shades of burgundy and eggplant are subtle self-striping sections from sock yarn.


I also used my loom to weave this soft angora scarf, it is narrow and I've used the same yarn on the warp (vertical stripes) as the weft (horizontal.)


Just a few samples.  Gotta go, listing on Etsy is pretty simple now ...

7/15/10

Sock Yarn

I know that people still hand knit socks.

In fact in reading the sock knitting patterns I can tell that the foot of a sock pattern is just like some of the slippers I've knit then felted.

But socks are so inexpensive I can't understand the time factor for knitting a pair of socks, and getting two of them knit just alike sounds like too much stress to me.

BUT, I have learned to greatly appreciate sock yarn.  It is awesome on my floor loom.  It is the perfect yarn for a draping scarf or wrap.  If made of 50% wool it is the softest, and now several commercial luxury yarn distributors have incredible colors and patterns.

I used the left over yarn from my granddaughter's sweater to weave a scarf, using Caron Simply Soft as the warp threads (pretty much hidden, but left long at both ends for fringe) the sock yarn as the more dominate colors.

7/13/10

I need a yarn swap = need to trade out some of my stash

I don't know about others, but after I've used a yarn for a few minutes, I can tell if I'm going to work with it or not.  By then it's too late to take it back to the store, because the first thing I do is wind it into a ball.

I found this link today when searching for Yarn Swap.


YARN SWAP

I want one this fall!!

You can buy this poster.